Voeg de Pinterest-tag toe aan Google Tag Manager om te ontdekken in hoeverre Pinterest invloed heeft op het verkeer naar je winkel en de verkoop van je producten.
De basiscode moet op alle pagina's van je website worden geïnstalleerd en verzamelt gegevens over verschillende gebeurtenissen, zoals wanneer iemand een product koopt of een product toevoegt aan zijn of haar winkelmand.
- Log in op je zakelijke Pinterest-account
- Klik op
het hamburgerpictogram linksboven op de pagina - Klik onder Zakelijk op Conversies
- Klik op Aan de slag
- Selecteer je verbindingsbron en klik op Doorgaan
- Klik op Overslaan
- Selecteer Google Tag Manager en klik vervolgens op Doorgaan
- Volg de instructies om de installatie van de basiscode te voltooien
- Ga naar Google Tag Manager om de nieuw gemaakte tag te bevestigen
- Als je conversietoeschrijving wilt gebruiken, klik je op de tag om de tagconfiguratie te openen. Klik op het plusje onder Gehasht e-mailadres en kies de gegevenslaagvariabele van de website voor het e-mailadres, of maak een nieuwe variabele aan.
Met gebeurteniscodes kun je de impact van je Pinterest-advertenties meten op bepaalde acties op je website. Ze zijn ook nodig als je
Voordat je je eerste gebeurteniscode installeert, moet je eerst de basiscode installeren. De basiscode moet altijd vóór de gebeurteniscode worden uitgevoerd.
Hou er rekening mee dat je de onderstaande stappen moet volgen telkens wanneer je een gebeurtenis toevoegt.
- Ga naar Google Tag Manager en klik op Een nieuwe tag toevoegen.
- Vul bovenaan (waar Naamloze tag staat) een naam voor je tag in.
- Klik op Tagconfiguratie.
- Klik rechtsbovenin op
het zoekpictogram en typ Pinterest in de zoekbalk. Klik op Pinterest Tag zodra die optie verschijnt. - Vul de ID van je Pinterest-tag in. Deze vind op je de pagina Conversies bij Tag-ID.
- Je kunt ook een variabele kiezen en deze hergebruiken. Klik hiervoor op
het plusje naast Tag-ID.
- Je kunt ook een variabele kiezen en deze hergebruiken. Klik hiervoor op
- Klik op het vervolgkeuzemenu bij Event to fire (Te activeren gebeurtenis) en kies de gebeurtenis die je op je website wilt bijhouden.
- Er verschijnen aanvullende invulvelden, afhankelijk van de optie die je kiest. Je kunt een waarde invullen of op het bouwsteentje klikken en de gegevenslaagvariabele voor de relevante gebeurtenisgegevens toevoegen.
- Voor addtocart-, checkout- en pagevisit-gebeurtenistags kun je een dynamische variabele als product_id-gebeurtenisgegeven toevoegen voor het maken van doelgroepen en retargeting.
- De dynamische product_id-variabele heeft geen extra syntaxis nodig - deze moet alleen het ID invullen dat overeenkomt met je inventaris.
- Als je meerdere product_id's tegelijk verwacht of wilt verzenden, moet je een gegevenslaagvariabele aanmaken die onze 'line_items'-syntaxis gebruikt. Hieronder vind je de opbouw en een voorbeeld van een 'line_items'-array.
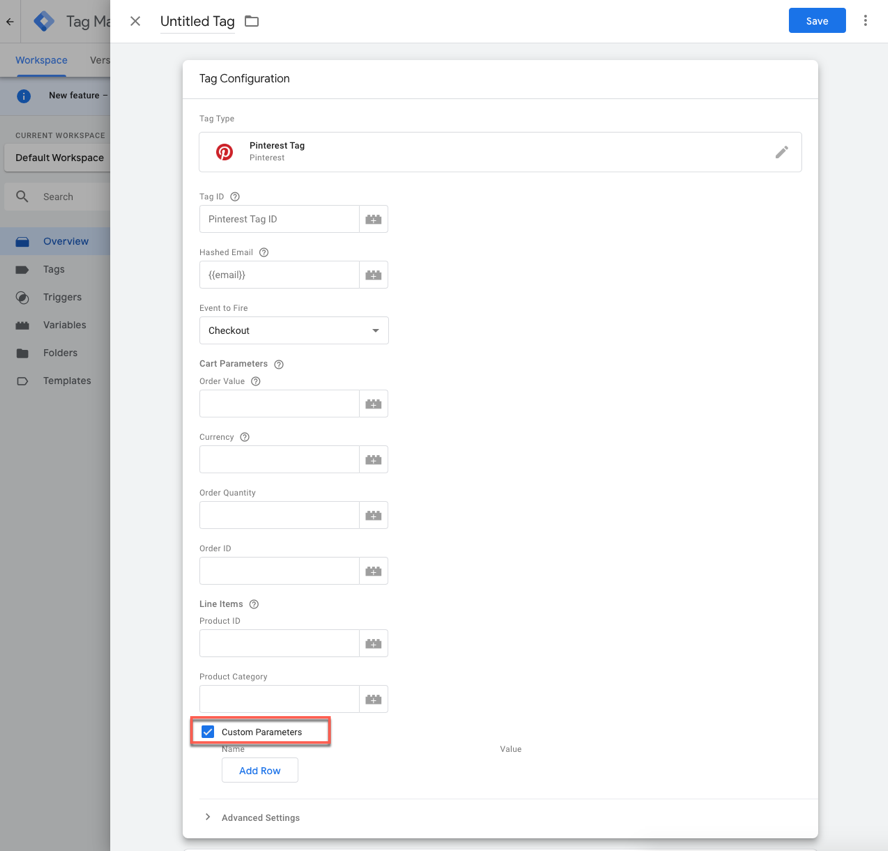
- Optioneel: vink eventueel de optie Aangepaste parameters aan om doelgroepen te targeten.
- Klik op Geavanceerde instellingen en vervolgens op Tagreeks.
- Vink de optie Een tag activeren aan voordat <naam gebeurteniscode> wordt geactiveerd.
- Klik op Tag selecteren en kies de basistag die je eerder hebt ingesteld in de vervolgkeuzelijst.
- Klik op Triggers en kies de specifieke actie of pagina die je gebeurtenis moet activeren.
- Klik rechtsbovenin op Opslaan.
- Klik op Verzenden om de wijziging te publiceren.
Je kunt meerdere product-ID's tegelijk invoeren om het verkeer naar al je producten bij te houden.
- Ga naar Google Tag Manager.
- Klik op de gebeurteniscode of -tag waar je product-ID's aan wilt toevoegen.
- Kies een gebeurtenis uit de vervolgkeuzelijst Event to Fire (Te activeren gebeurtenis).
- Vink de optie Custom Parameters (Aangepaste parameters) aan. Laat Product ID en Product Category bij Line Items (Regelitems) leeg wanneer je aangepaste parameters toevoegt.
- Klik op Rij toevoegen om een variabele toe te voegen.
- Vul een naam voor je variabele in bij Name (Naam). Klik vervolgens op + bij Value (Waarde).
- Kies een bestaande variabele uit de lijst of klik rechtsbovenin op + om een nieuwe variabele te maken.

- Klik op Triggers om de benodigde triggers voor je website in te stellen.
- Klik op Opslaan.
Je moet hiervoor tevens een gegevenslaagvariabele maken met de naam 'items' op elke pagina waarvoor je product-ID's en productcategorieën wilt instellen. Je kunt ze hier allemaal instellen:
<script>
  dataLayer = [{
    items : [
      {
        product_id: '1414',
        product_category: 'Schoenen'
      },
      {
        product_id: 'ABC',
        product_category: 'Speelgoed'
      }
     ]
    }];
</script>
Als je de gegevenslaag eenmaal hebt toegevoegd, publiceer je de code van je website of sla je deze op.
Je kunt ook gegevens van de gebeurtenis-ID opnemen voor ontdubbelingsdoeleinden.
- Ga naar Google Tag Manager
- Klik op de gebeurteniscode of -tag waar je product-ID's aan wilt toevoegen
- Klik op het veld onder Event to Fire ((Te activeren gebeurtenis) en selecteer vervolgens een gebeurtenis in de lijst
- Vink de optie Custom Parameters (Aangepaste parameters) aan
- Klik op Rij toevoegen om een variabele toe te voegen
- Vul onder Naam 'event_id' in als naam voor je variabele en klik vervolgens op
het plusje onder Waarde om een waarde op te geven- Opmerking: de Value (Waarde) moet dynamisch worden gegenereerd voor elke gebeurtenis, zodat deze uniek is voor de gebeurtenis
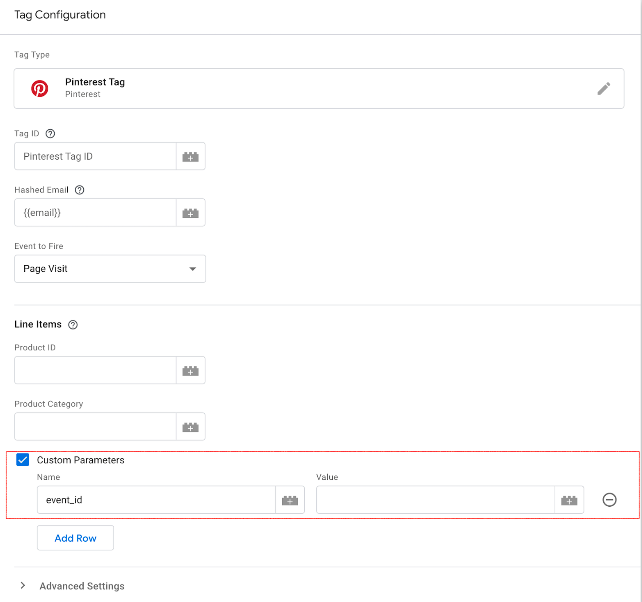
- Opmerking: de Value (Waarde) moet dynamisch worden gegenereerd voor elke gebeurtenis, zodat deze uniek is voor de gebeurtenis
- Klik op Opslaan
Gebruik je een